The interface
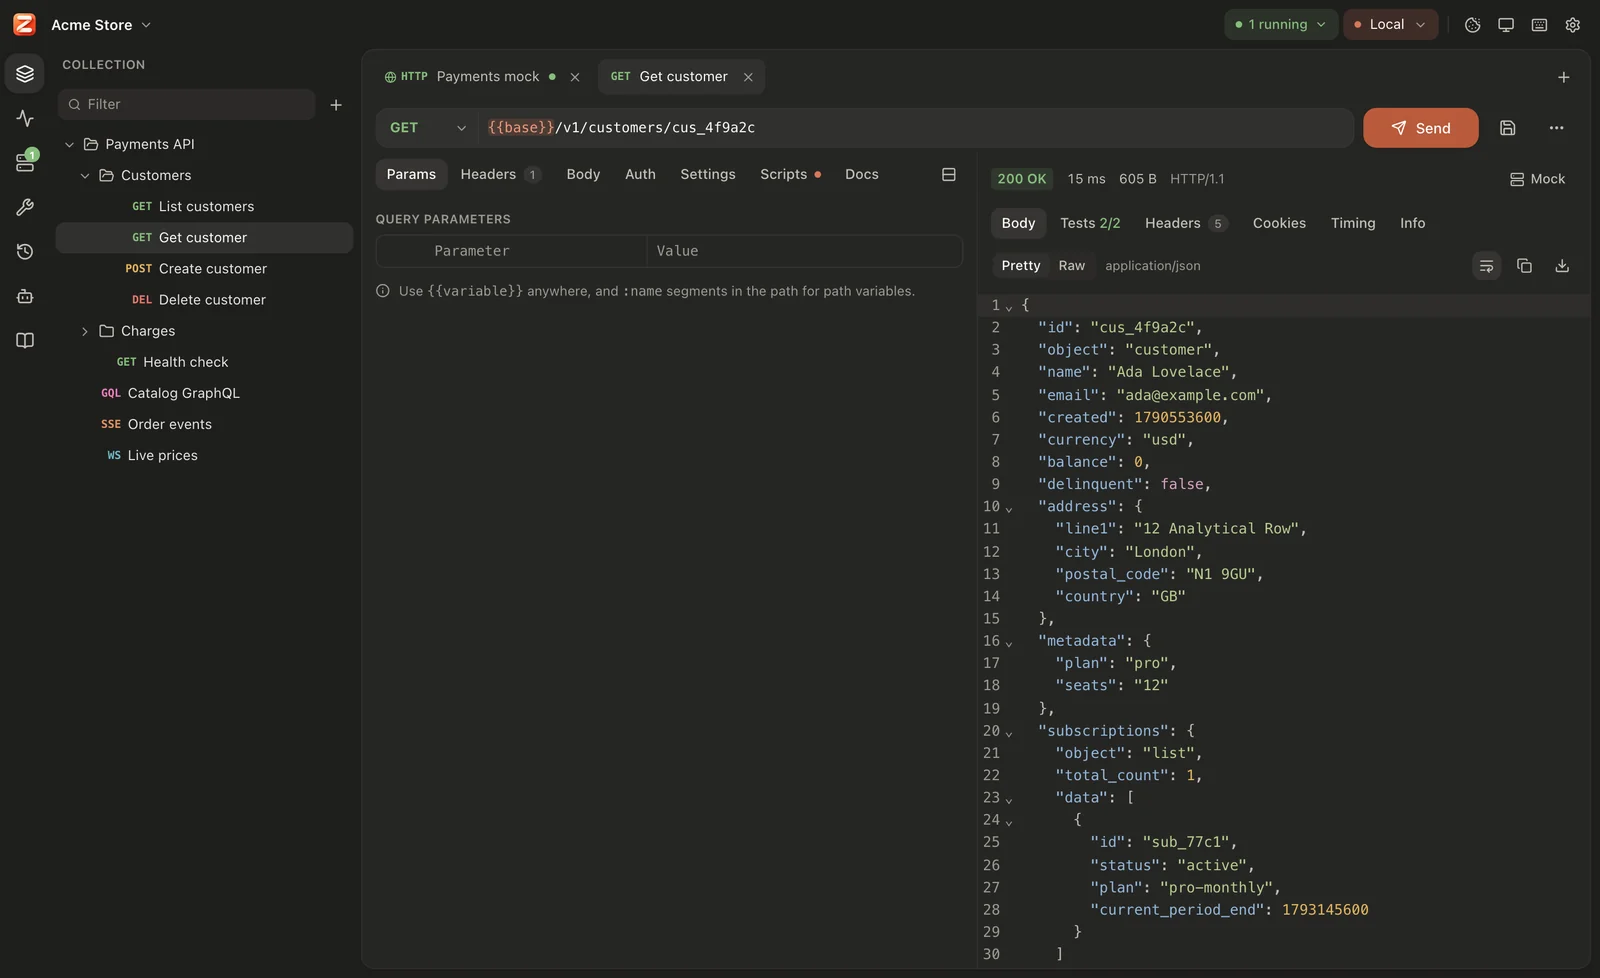
With a workspace open, the window has five parts:
- The title bar at the top: the workspace, the active environment and app-wide controls.
- The left rail: icons that switch what the sidebar shows.
- The sidebar: the collection, load tests, servers, tools, history, AI agents or docs.
- The tab bar: everything you have open.
- The work area: for a request, the request editor and its response.
In this documentation, Mod means ⌘ on macOS and Ctrl on Windows and Linux.
Title bar
Section titled “Title bar”Zorvik draws its own title bar. Drag any empty part of it to move the window. On macOS the traffic-light buttons sit on its left; on Windows and Linux, Minimize, Maximize and Close are on its right.
On the left:
- The workspace menu: the name of the open workspace. It opens the Training Bootcamp, Workspace settings…, Open workspace…, recent workspaces and Close workspace. See Workspaces.
- Workbench | Academy: only in the Training Bootcamp workspace. It switches between the course and the normal app. See Training Bootcamp.
On the right, some items appear only while something is going on:
| Item | When | Does |
|---|---|---|
| Agent name, e.g. Claude Code | An AI agent is connected | Shows the agent’s activity in the AI agents sidebar; a number shows how many questions wait for you. The square button disconnects the agent. See AI agents. |
| Load test and a timer | A load test runs | Opens the load test; the square button stops it |
| N running | Servers are running | Lists every running server, in any workspace, to open or stop them; Stop all stops them all |
| Environment picker | Always | Shows the active environment (or No environment). Choose another one, or Manage environments…. See Variables & environments. |
| Cookie icon | Always | The workspace’s cookie jar. See Cookies. |
| Theme icon | Always | Cycles the theme: match system → dark → light |
| Keyboard icon | Always | The list of keyboard shortcuts |
| Gear icon | Always | Settings (Mod+,) |
Left rail and sidebar
Section titled “Left rail and sidebar”The rail on the far left switches the sidebar between seven sections. Hover an icon to see its name.
| Section | Shows |
|---|---|
| Collection | The requests and folders of the workspace, with Filter and + (new request, new folder, import, run, mock, load test). See Workspaces. |
| Load tests | The workspace’s load tests. A pulsing dot on the icon means one is running. See Load testing. |
| Servers | Mock APIs and other servers. A badge on the icon counts the running ones. See Mock servers. |
| Tools | Network tools that open in their own tab: TLS inspector, DNS lookup, Port check, Ping, Network interfaces, Encoders and HTTP/3 check |
| History | Every request you sent in this workspace. See Responses. |
| AI agents | What connected agents do, and how to connect one. A green dot on the icon means an agent is connected. See AI agents. |
| Docs | Short in-app docs for every feature |
Drag the border between the sidebar and the work area to resize the sidebar (200 to 560 pixels). The section you chose and the sidebar width are remembered.
Every request, server, load test, collection run and tool opens in a tab.
- New tab: the + at the right end of the tab bar offers every kind of request. Mod+N opens a new HTTP request.
- Badges: a request tab shows its method (or
GQL,WS,SSE,TCP,UDP,DNS,MQTT,gRPC,SIO), servers and load tests their kind. Hover a tab to see its file. - Unsaved: a tab that was never saved shows its name in italics. A tab with unsaved changes shows a dot where the close button is; hover it to close.
- Live: a green dot means a connection is open or a request is running; a pulsing dot means a load test or collection run is going.
- Close: Mod+W, the ×, or a middle click. Right-click a tab for Close and Close others. Closing a tab with unsaved changes asks Discard unsaved changes? A new tab you haven’t typed anything into closes without asking.
- Switch: click a tab, or press Ctrl+Tab (next) and Ctrl+Shift+Tab (previous). This is Ctrl on every system, also on macOS.
Opening a request that already has a tab switches to that tab. Tabs are remembered per workspace: when you reopen a workspace, its tabs come back as you left them, including unsaved changes.
Command palette
Section titled “Command palette”Press Mod+K (or Mod+P) to open Go to. Type to search requests, load tests, servers and tools; it also has Run collection and Open the Academy.
- Every word you type must appear in the item’s name, its folder path or its kind. For example,
users postfinds POST requests in aUsersfolder, andserverlists all servers. - ↑ and ↓ move, Enter opens, Esc closes.
- It shows up to 100 results.
While another dialog is open, Mod+K does nothing, so unsaved changes in it can’t be lost; close the dialog first.
Keyboard shortcuts
Section titled “Keyboard shortcuts”| Shortcut | Does |
|---|---|
| Mod+Enter | Send the request, connect, start the server, start the load test, or start and stop a collection run |
| Mod+S | Save |
| Mod+N | New HTTP request |
| Mod+W | Close the tab |
| Mod+K or Mod+P | Command palette |
| Mod+L | Jump to the URL field |
| Mod+E | Environments & variables |
| Mod+, | Settings |
| Ctrl+Tab / Ctrl+Shift+Tab | Next / previous tab |
| Mod+F | Search in an editor or a response body |
| Mod++ / Mod+− | Zoom in / out |
| Mod+0 | Reset the zoom to 100 % |
- Most shortcuts work only with a workspace open, and not while a dialog is open. Zoom works everywhere.
- In the URL field, and in the rows of the query parameter, header and form tables, Enter sends the request too.
- The keyboard icon in the title bar shows this list in the app.
See also the keyboard shortcuts reference.
Layout
Section titled “Layout”The response can be beside the request (the default) or below it:
- Choose the layout icon at the right end of the request’s tab strip (Stack response below or Show response beside).
- Or set Settings → General → Response position: Beside the request or Below the request.
Drag the border between the request and the response to share the space between them; each side keeps at least 20 %. The layout, the split and the sidebar width are stored on this computer, not in the workspace.
Themes
Section titled “Themes”Zorvik has a light and a dark theme.
- Settings → General → Theme: Match system (the default), Dark or Light. Match system follows your operating system, also when it changes during the day.
- The theme icon in the title bar cycles through match system, dark and light.
Zoom makes the whole interface bigger or smaller: text, icons and layout together.
- Mod++ and Mod+− step through 50, 67, 75, 80, 90, 100, 110, 125, 150, 175 and 200 %. Mod+0 goes back to 100 %.
- Settings → General → Zoom has the same steps, with Zoom out, Zoom in and Reset buttons.
Zoom applies at once and is saved right away. It works on the welcome screen and in dialogs too.
Settings → General has three font settings. Font changes preview while the Settings dialog is open; choose Save to keep them.
| Setting | Applies to | Default |
|---|---|---|
| Interface font | Menus, lists, forms and tabs | The system font |
| Code font | Editors, response bodies, headers and other code | The system’s monospace font |
| Code text size | Editors and response bodies, on top of the zoom: 10 to 24 px | 13 px |
| Ligatures | Draw =>, != and >= as single symbols with code fonts that have them (Fira Code, JetBrains Mono, Cascadia Code) | Off |
Type any installed font’s name. The suggestions list the common fonts installed on this computer. A font that isn’t installed says Not installed on this computer: the default font is used. Choose Default to go back to the system font.
Theme, zoom and fonts are stored in the app’s settings on this computer. See Settings.